🏬Supersize Online Funeral Retailer🪦1000's of Headstones⚱️Over 10,000 Cremation Urns⚰️Caskets Overnight Delivery🛒Funeral & Memorial Superstore🚚FREE Shipping on ALL Orders👨👩👧👦Helping Families for over 20 Years💰Lowest Price Guarantee🏬Supersize Online Funeral Retailer🪦1000's of Headstones⚱️Over 10,000 Cremation Urns⚰️Caskets Overnight Delivery🛒Funeral & Memorial Superstore🚚FREE Shipping on ALL Orders👨👩👧👦Helping Families for over 20 Years💰Lowest Price Guarantee
🏬Supersize Online Funeral Retailer🪦1000's of Headstones⚱️Over 10,000 Cremation Urns⚰️Caskets Overnight Delivery🛒Funeral & Memorial Superstore🚚FREE Shipping on ALL Orders👨👩👧👦Helping Families for over 20 Years💰Lowest Price Guarantee🏬Supersize Online Funeral Retailer🪦1000's of Headstones⚱️Over 10,000 Cremation Urns⚰️Caskets Overnight Delivery🛒Funeral & Memorial Superstore🚚FREE Shipping on ALL Orders👨👩👧👦Helping Families for over 20 Years💰Lowest Price Guarantee
How to Open a Pet Urn & Transfer Ashes Safely | Memorials.com Info Center
🏬Supersize Online Funeral Retailer🪦1000's of Headstones⚱️Over 10,000 Cremation Urns⚰️Caskets Overnight Delivery🛒Funeral & Memorial Superstore🚚FREE Shipping on ALL Orders👨👩👧👦Helping Families for over 20 Years💰Lowest Price Guarantee🏬Supersize Online Funeral Retailer🪦1000's of Headstones⚱️Over 10,000 Cremation Urns⚰️Caskets Overnight Delivery🛒Funeral & Memorial Superstore🚚FREE Shipping on ALL Orders👨👩👧👦Helping Families for over 20 Years💰Lowest Price Guarantee
Receiving your beloved pet's ashes is a deeply personal moment. Whether you're opening a temporary crematory container and transferring remains to a permanent pet urn, dividing ashes into pet keepsake urns, or simply opening your urn for the first time, knowing how to do this carefully and respectfully matters.
This guide walks you through the process step-by-step, covering different urn types, tools you'll need, and techniques for a smooth, dignified transfer.
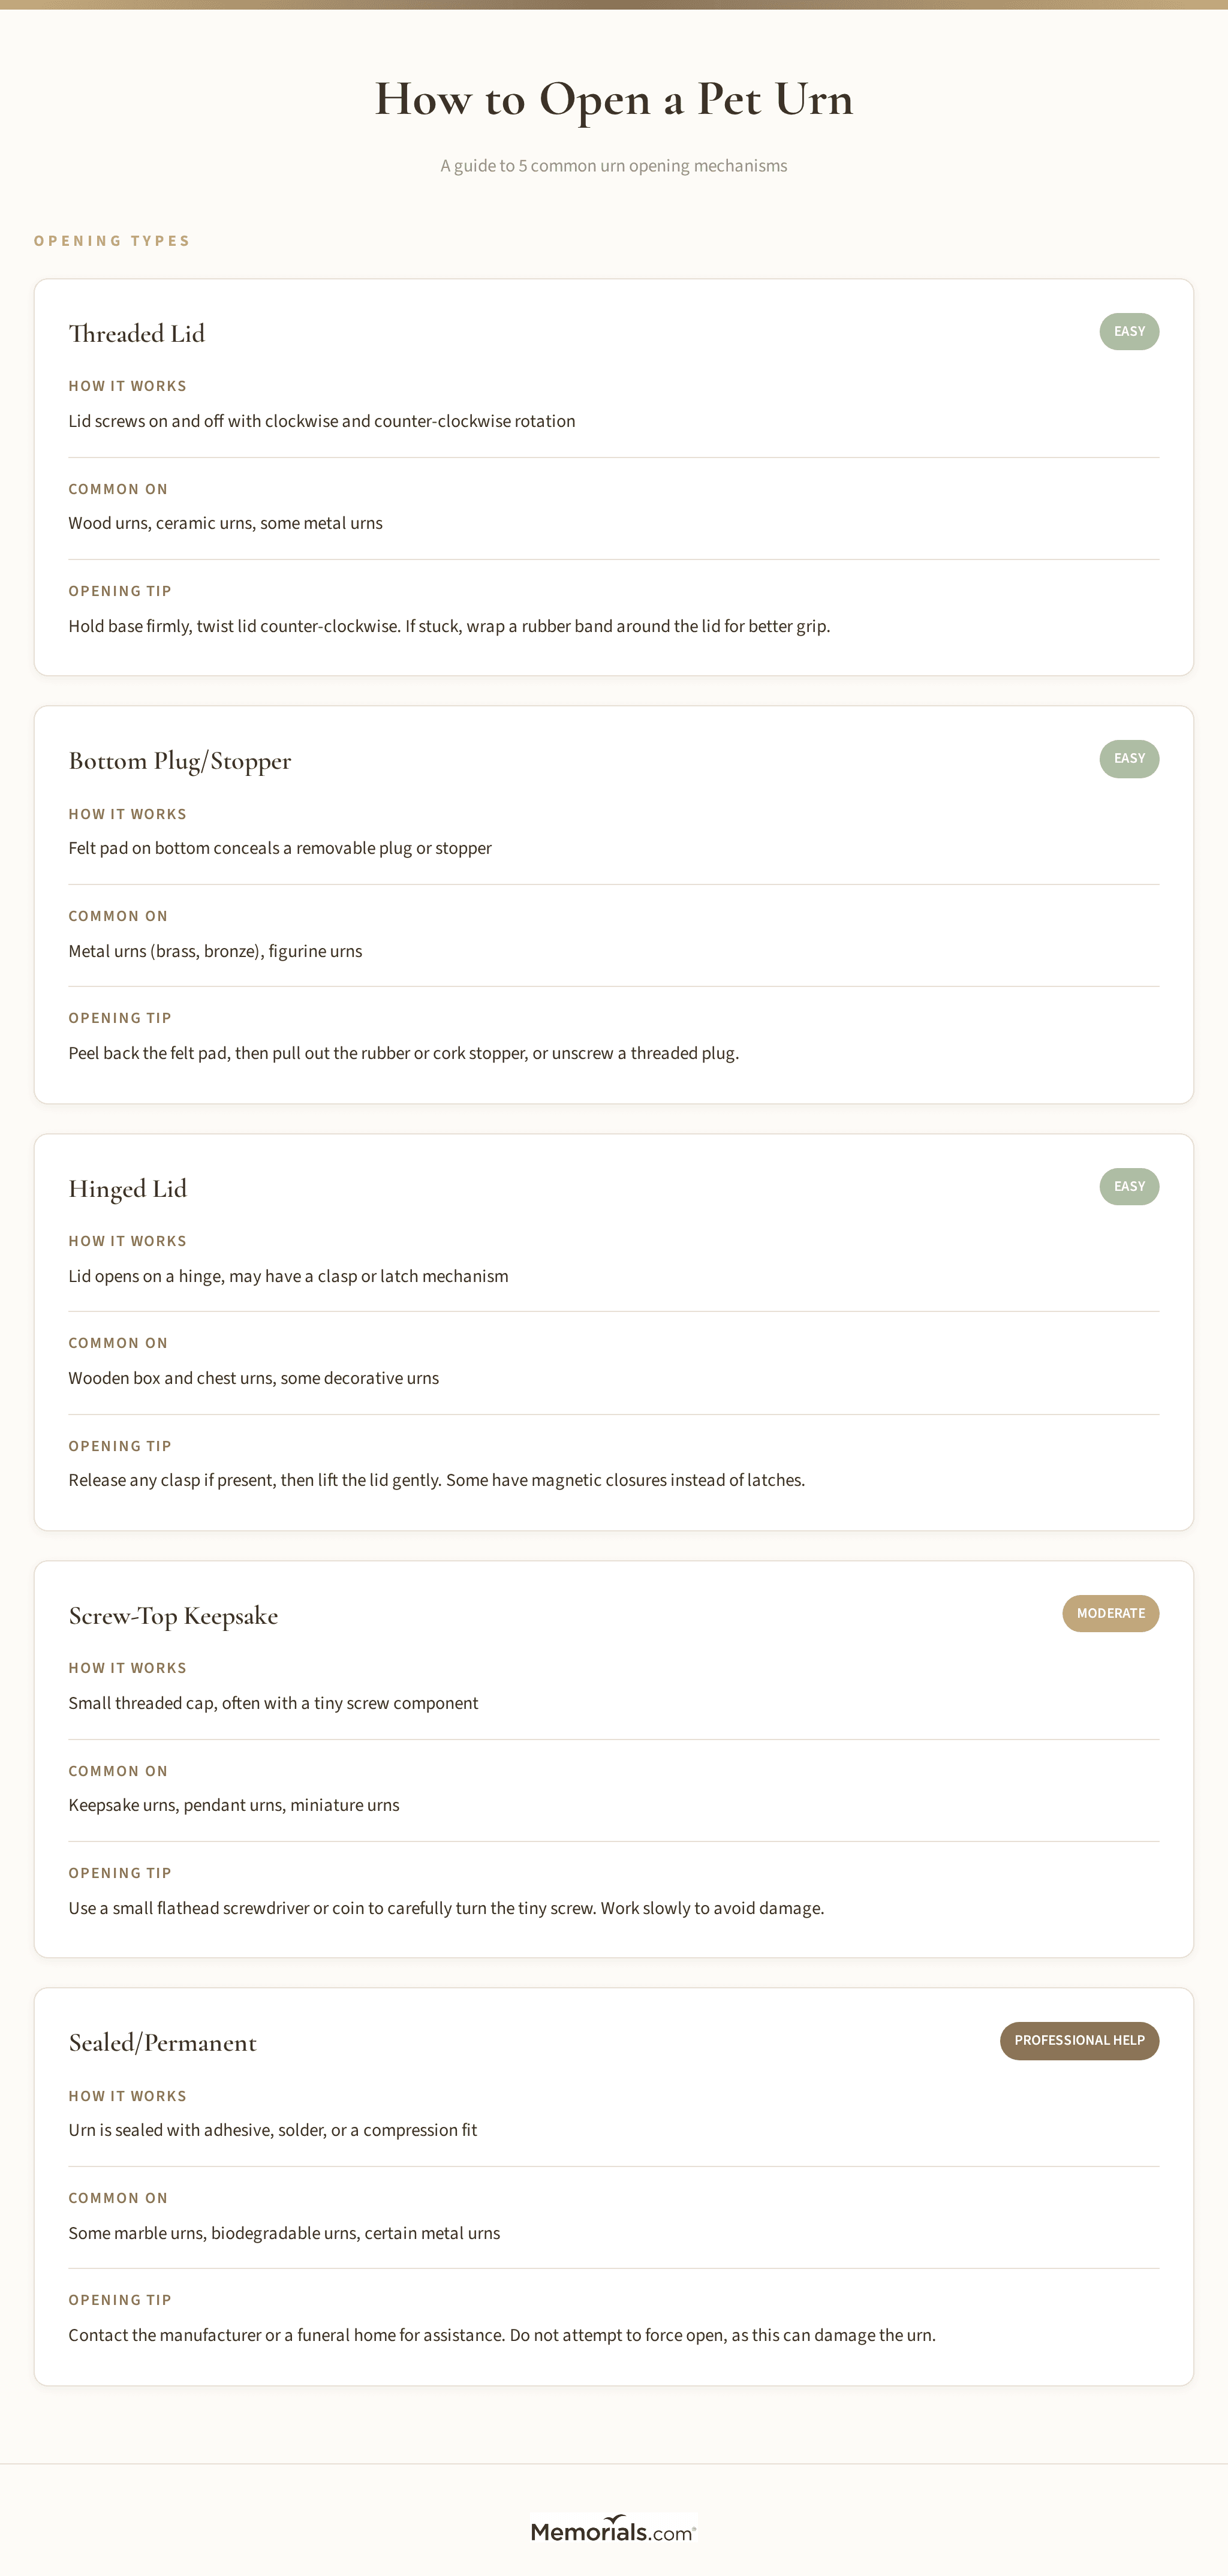
Understanding Pet Urn Opening Types
Not all urns open the same way. Before attempting to open your urn, identify which type you have. This prevents damage to the urn and helps you approach the process with the right technique.
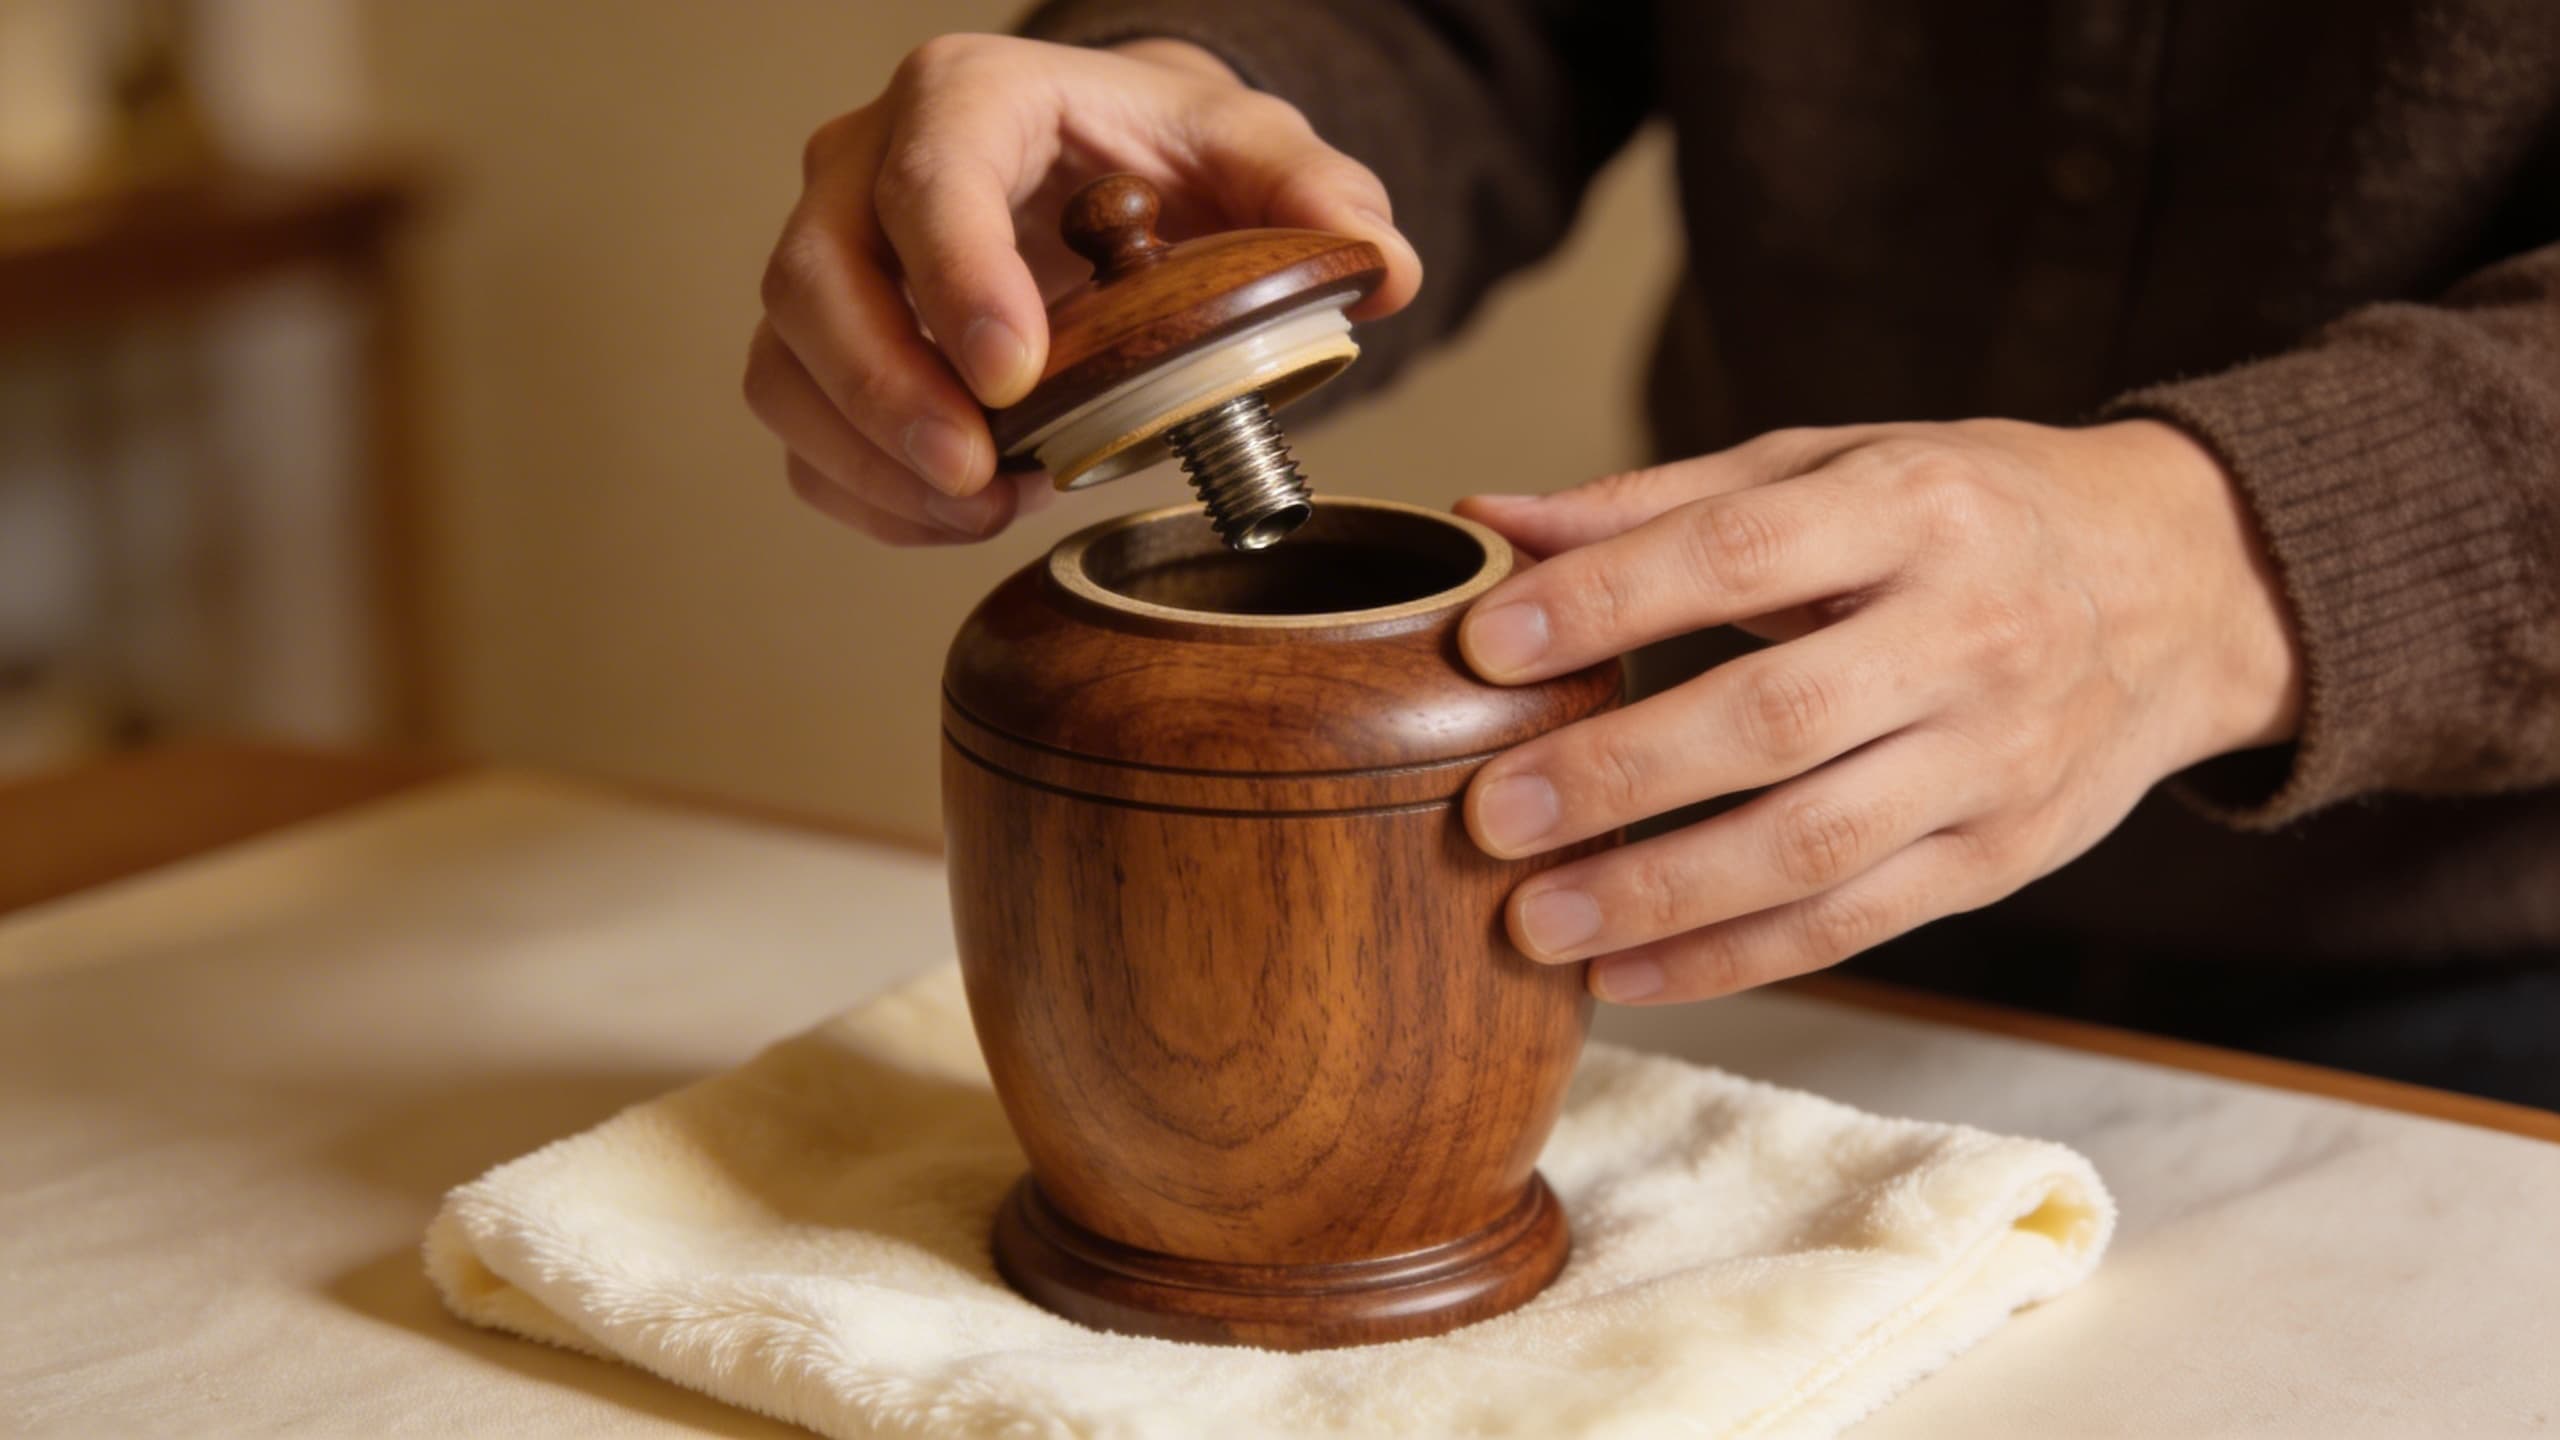
Appearance: The lid has a grooved ridge that twists onto the urn body.
How to open: Grip the body gently with one hand and slowly twist the lid counterclockwise. Many threaded lids open with gentle, steady pressure—there's no rush. If the lid feels stuck, don't force it.
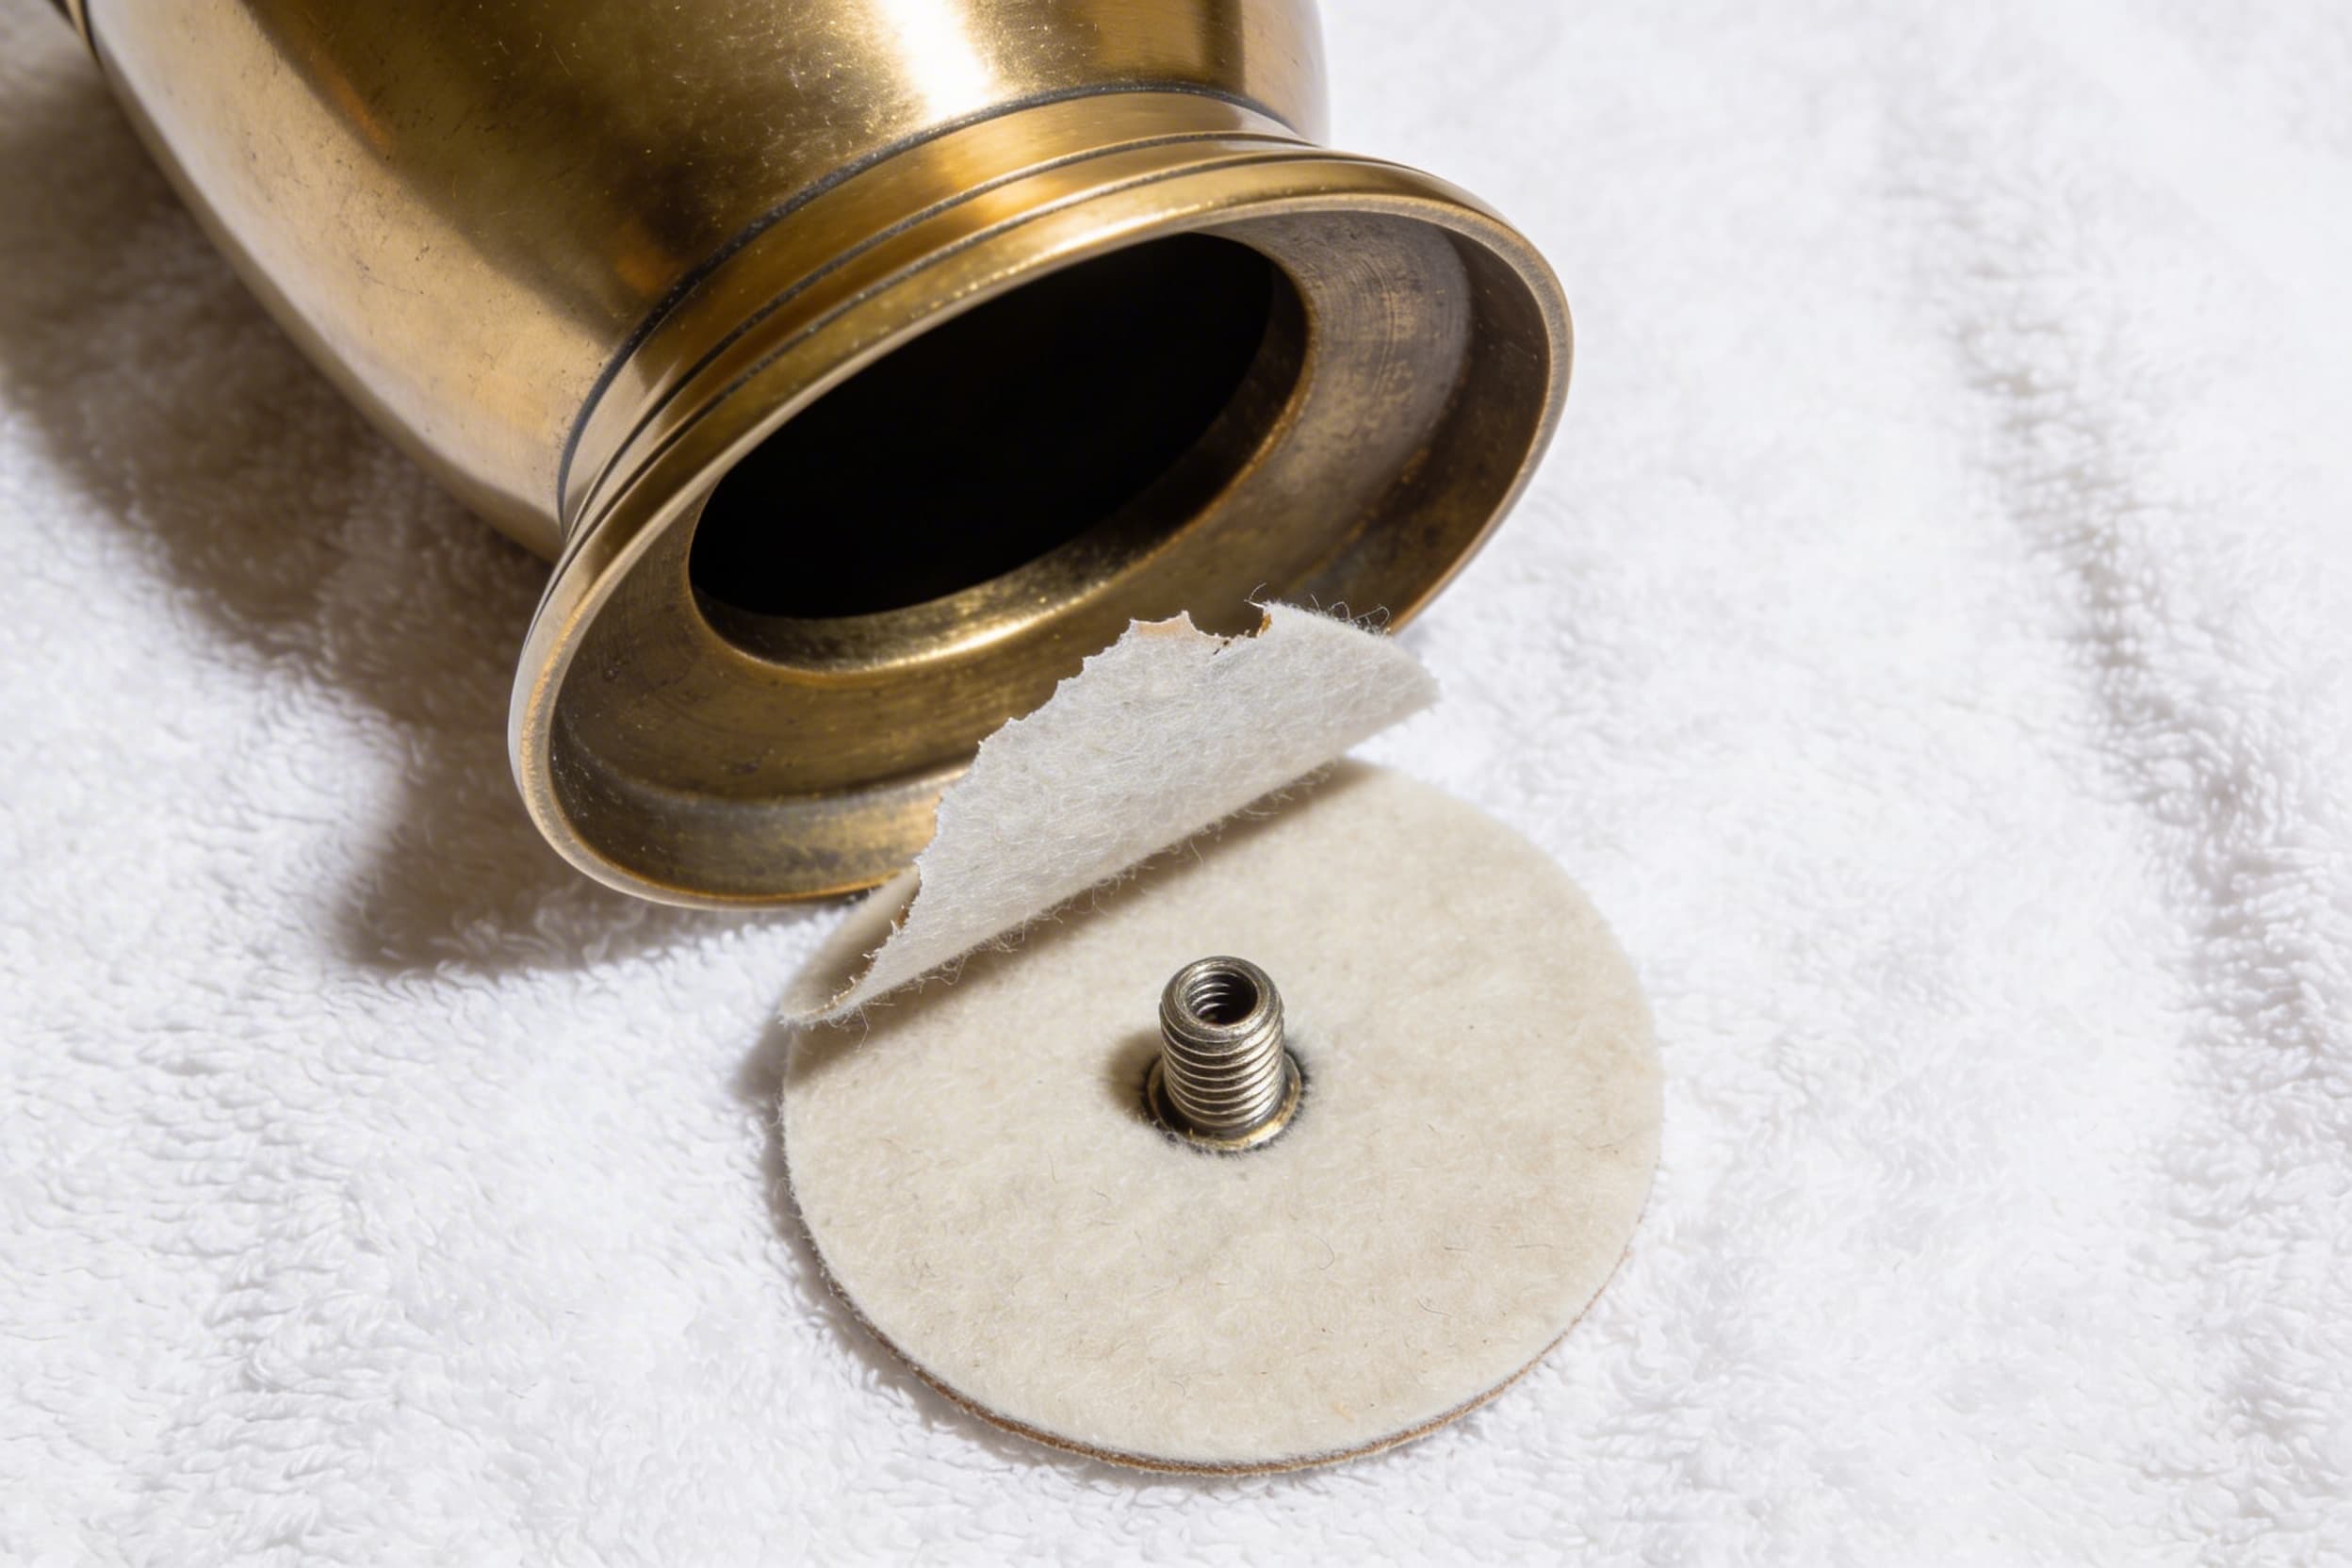
Appearance: The urn opens from the underneath. You'll see a removable panel or plug secured by screws.
How to open: Place the urn upright on a clean cloth. Use a screwdriver (flathead or Phillips, depending on your urn) to carefully remove the screws. Some urn models have 2–4 screws. Once screws are removed, gently lift away the bottom panel or plug.
Best for:Wooden pet urns and budget-friendly models. This design keeps the top aesthetically seamless.
3. Hinged Lid
Appearance: The lid is attached to the urn body with a small hinge on one side.
How to open: Gently lift or swing the hinged lid upward. It should move smoothly. Some models have a small latch to release first. Always lift slowly to avoid sudden movement that could scatter ash.
Best for: Keepsake and decorative urns where easy, frequent access is desired.
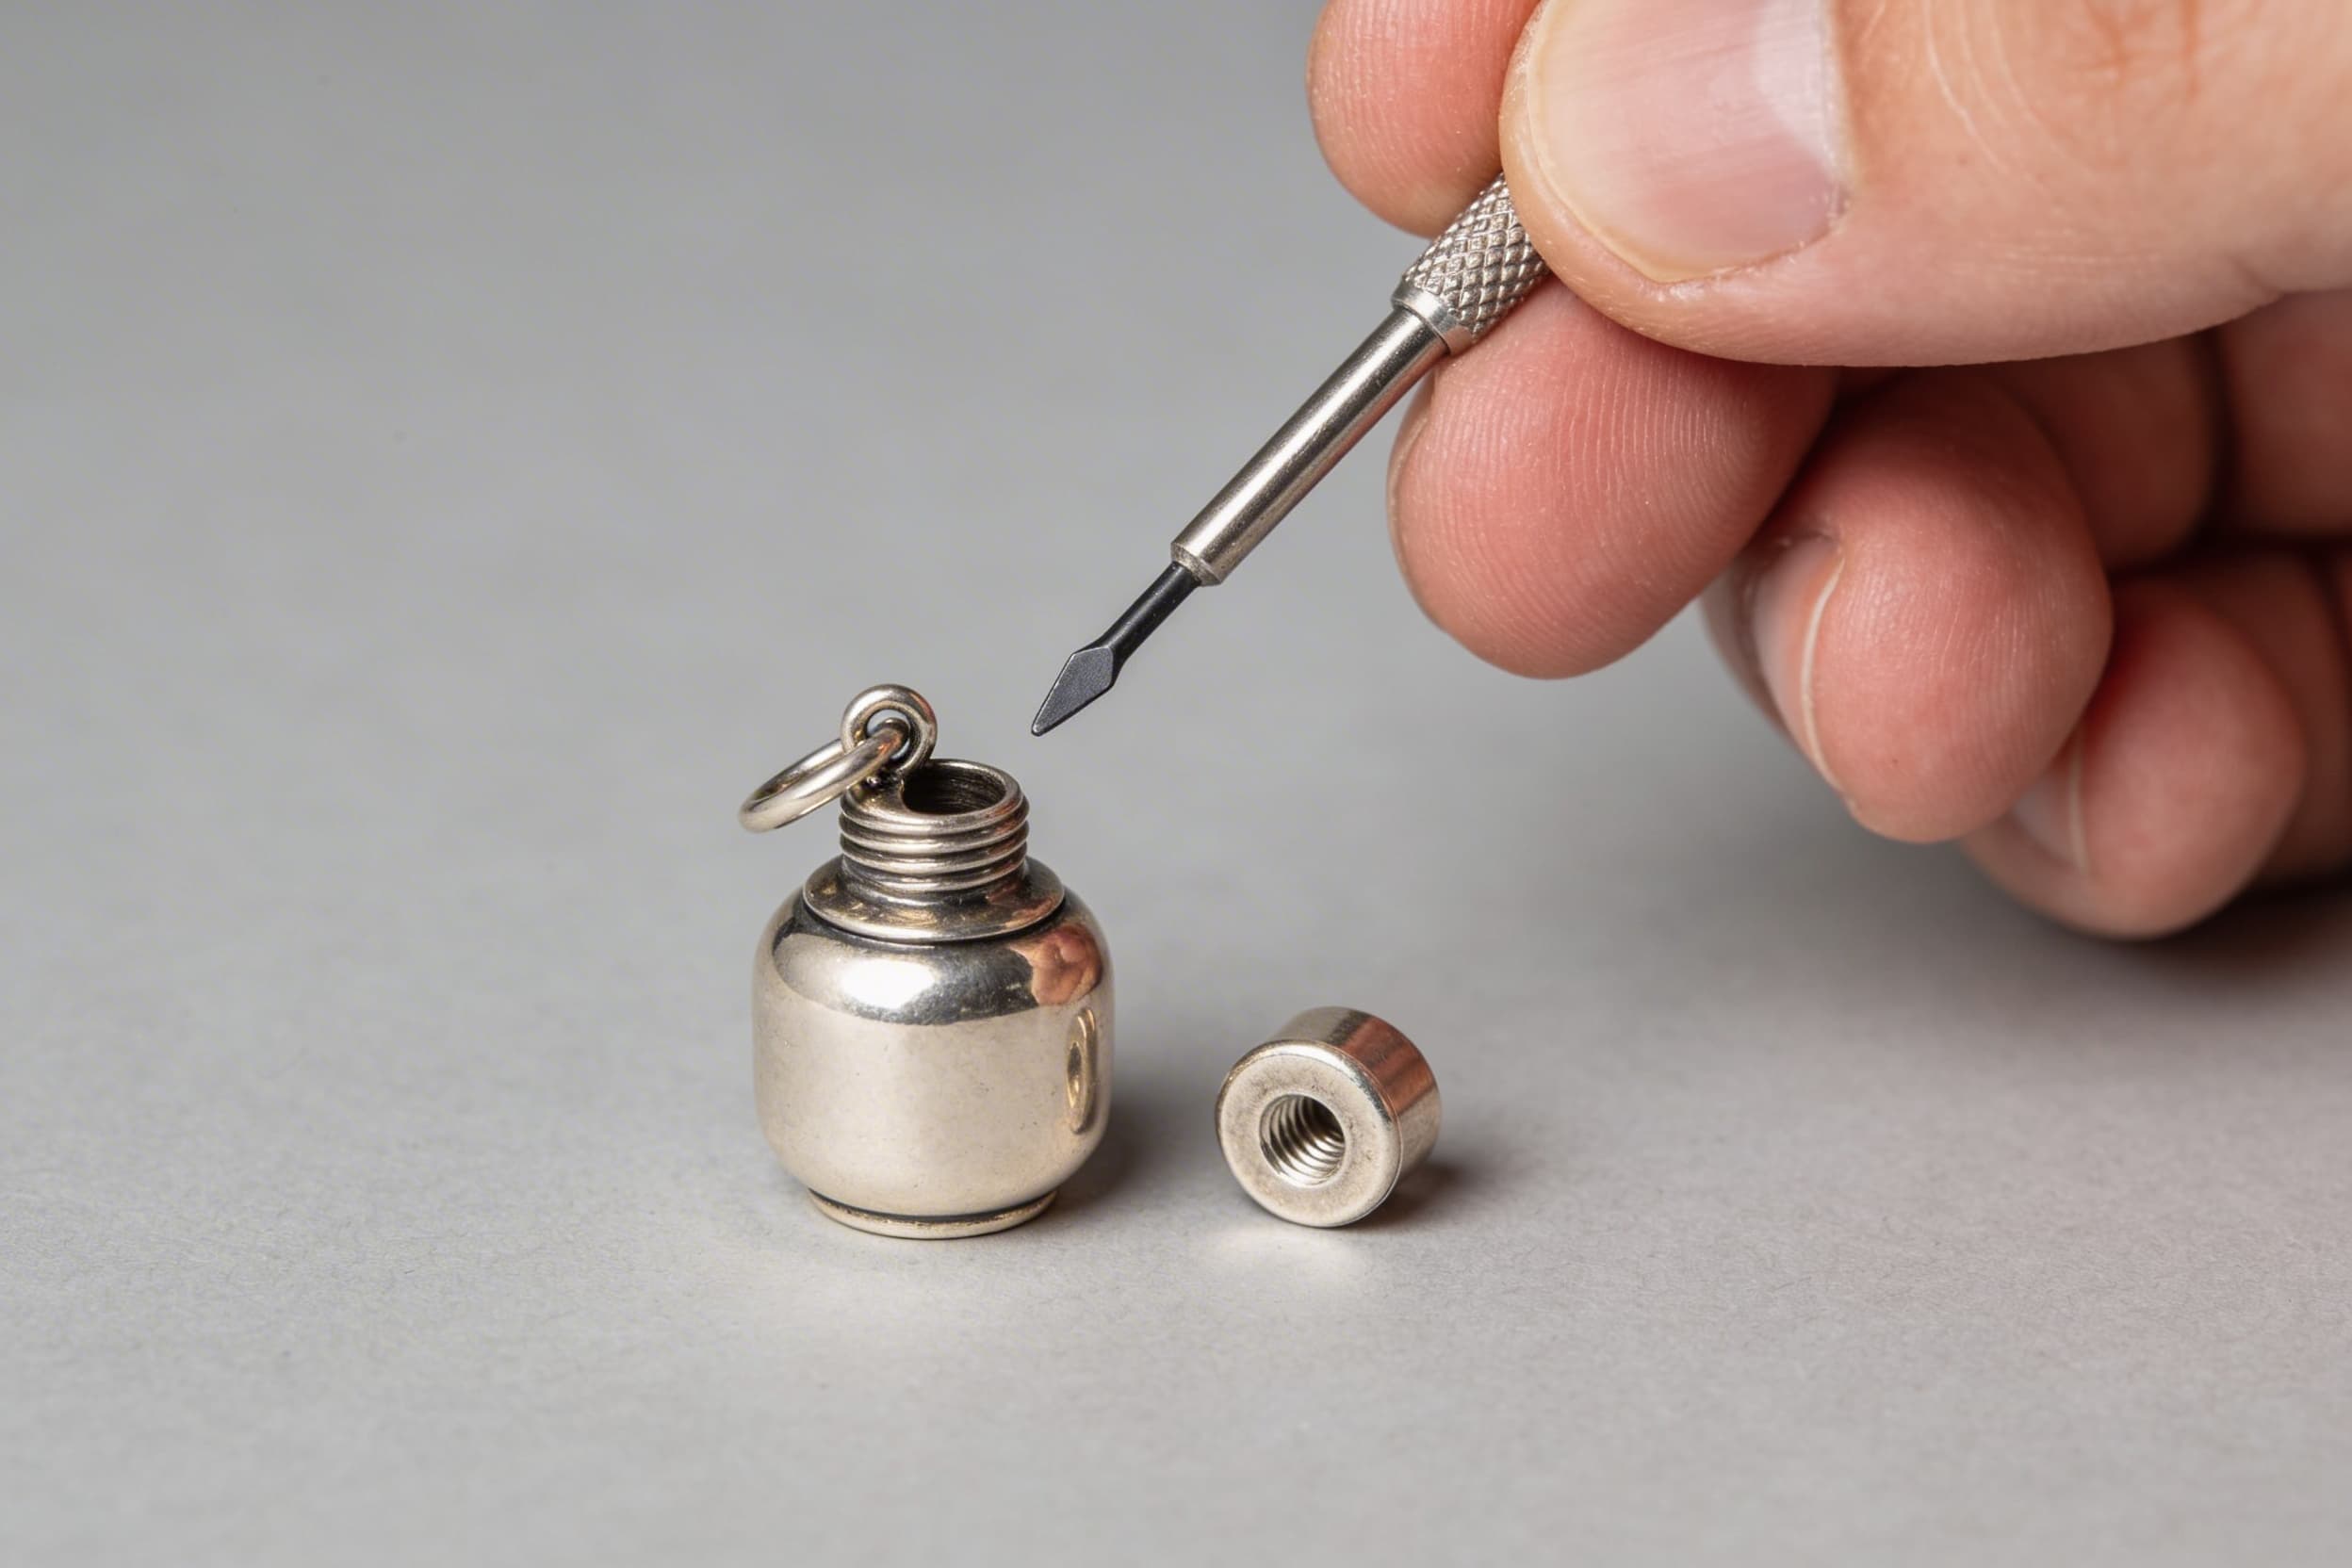
4. Screw-Top Keepsake Urns
Appearance: A small, separate threaded opening (usually at the top or side) distinct from the main urn body.
How to open: Grip the main urn body and slowly twist the threaded cap counterclockwise. These openings are typically smaller and may require gentle precision.
Best for: Small memorial keepsakes or dividing ashes among family members.
5. Sealed Urns
Appearance: No visible seams or openings; the urn is permanently sealed with adhesive (silicone, epoxy, wax, or metal glue).
When you encounter these: Sealed urns are sometimes used when the crematory wants to ensure the urn cannot be accidentally opened in transit. Most sealed urns can be opened, though the process takes patience.
How to open: See the troubleshooting section below.
Step-by-Step Guide to Transferring Pet Ashes
Once you understand your urn type, follow this process to transfer your pet's ashes respectfully and safely.
Step 1: Prepare Your Workspace
Choose a calm, clean location — ideally indoors where there are no strong drafts or air currents. A kitchen table, dining table, or any stable, flat surface works well.
Gather everything you need before you start. Once you open the temporary container, you'll want to work smoothly without reaching for things.
Lay down a clean cloth or towel on your work surface. This catches any accidental spills and gives you a soft, respectful base to work on.
Ensure good lighting. You want to see what you're doing. Natural light or a lamp helps you work calmly and carefully.
Step 2: Gather Your Tools
You don't need expensive equipment. Here's what most families use:
Small funnel or funnel kit (specifically designed for ashes, or a standard kitchen funnel that's been thoroughly cleaned)
Clean cloth (lint-free preferred, but any soft cloth works)
Gloves (optional—latex, nitrile, or cotton; some families prefer them for a sense of control and cleanliness)
Flat screwdriver or Phillips screwdriver (if your urn has a screw-panel opening)
Paper towels (for gentle cleanup)
Small spoon or scoop (optional, but helpful for guiding ashes if you don't have a funnel)
Note: Ashes are completely safe to handle with bare hands. They're sterile and won't transmit disease. Gloves are purely a personal comfort choice.
Step 3: Open the Temporary Container
Your pet's ashes likely arrived in a temporary plastic or cardboard bag inside a box, or possibly in a small temporary container.
Be gentle and intentional. Open the bag or container slowly. If ashes are loose, move slowly to minimize disturbance. If the ashes came sealed in a bag, you may cut a corner of the bag rather than fully opening it—this gives you better control as you pour.
Position the container so the opening is directly over your work area. You want a straight, controlled pour into your funnel or urn.
Step 4: Set Up Your Funnel and Urn
Position your permanent urn on the clean cloth, directly in front of you.
If using a funnel: Insert the funnel's stem into the urn's opening. Make sure it's secure and stable. If you're using a standard kitchen funnel, hold it gently in place with one hand while pouring with the other, or have a helper steady it.
If not using a funnel: You can pour slowly and carefully directly into the urn opening, but a funnel reduces the risk of spilling.
Step 5: Pour Ashes Gently
Move slowly. The most important rule: there's no rush. Cremated remains are fine and powdery. Pouring slowly gives gravity time to work and keeps disturbance to a minimum.
Pour steadily but gently. You're not dumping; you're guiding. Imagine pouring sand into an hourglass—smooth, controlled, continuous.
Watch the urn fill. You'll quickly see how much space is available. Most permanent urns have good capacity, but for very large pets, you may need two urns or to plan ahead.
Use a small scoop to finish. Once the bulk is transferred, use a clean spoon or scoop to guide any remaining ashes into the urn. This gives you precise control over the final bits.
Step 6: Seal the Urn
Once ashes are transferred, carefully seal your urn according to its type:
Threaded lid: Twist clockwise until snug (don't over-tighten)
Bottom panel: Replace the panel and secure screws firmly but gently
Hinged lid: Close gently until it latches or rests securely
Screw-top keepsake: Twist the cap clockwise until snug
Don't force anything. If a lid or panel resists, stop and assess. You may be applying pressure at the wrong angle.
Step 7: Clean Up and Store
Wipe down the exterior of the urn with a soft, dry cloth to remove any residual dust.
Dispose of the temporary container respectfully. Many families keep the temporary container for a while before recycling it, as it feels like part of the goodbye. Others recycle it immediately. There's no right answer—do what feels right to you.
Store your urn in a safe, stable location. A shelf at eye level, a bookcase, or a dedicated memorial space all work well. Keep the urn away from high traffic areas where it could be bumped, away from direct sunlight (which can fade certain materials over time), and away from moisture and humidity.
When to Transfer Pet Ashes
Understanding the right time to transfer ashes helps you approach the process with intention.
From Temporary Container to Permanent Urn
This is the most common scenario. Crematories typically return ashes in a temporary plastic or cardboard container because it's economical and protects the urn during shipping. Once you receive your ashes and your permanent urn, you can transfer at your own pace—there's no deadline.
From One Permanent Urn to Another
Perhaps you're changing your mind about which urn to use, or you've chosen a display urn that's different from your original choice. The process is identical to the steps above. Open the original urn, transfer ashes to the new one, and seal securely.
Splitting Ashes Into Keepsake Urns
Many families want to divide their pet's ashes among family members or split them between a main urn and smaller keepsakes. Pet cremation jewelry is another popular option — a single pendant or bracelet needs only a pinch of ashes. This is completely acceptable and increasingly common.
Plan ahead: Decide how you want to divide the ashes (e.g., 50/50 between two family members, or a small keepsake and a larger urn).
Use the funnel method: For keepsakes, a small funnel is essential. You can also pour into a small temporary container first, then transfer to each keepsake urn individually.
Label keepsakes: If storing multiple urns, consider small labels so family members know which urn contains which portion. Some families use dates or names.
For more information on this sensitive decision, see our guide on whether it's wrong to separate cremated ashes.
What to Do If Your Urn Won't Open
Sometimes urns arrive sealed or the lid sticks. Here are solutions for common scenarios.
Sealed Metal Urns
What it is: The crematory sealed the urn with silicone epoxy, wax, or metal adhesive to prevent accidental opening during transport.
How to open it:
Try gentle heat. Wrap a warm (not hot) damp cloth around the seam between the lid and body. Let it sit for a minute. The warmth can slightly soften adhesive. Gently try twisting the lid.
Use acetone or solvent. Dip a cotton swab in nail polish remover (acetone) or an epoxy solvent. Run the swab along the sealed seam. Repeat 2–3 times, allowing time for the solvent to penetrate between applications. Gently twist and wiggle the lid.
Gentle scraping. Use a plastic scraper, old credit card, or soft plastic tool to gently scrape along the seam. Metal tools can scratch the urn, so avoid them.
Twist and wiggle. Apply gentle, steady pressure while twisting counterclockwise and wiggling the lid side to side. Don't rush—let the loosening happen gradually.
Note: If the epoxy is industrial-strength, you may need to contact the crematory or urn supplier. Many are willing to open urns for customers who are having difficulty. There's no shame in asking for help.
Wooden Urns with Stuck Screws
What it is: The bottom panel screws may have become stuck due to wood swelling or tight fitting.
How to open it:
Apply penetrating oil. Use a light machine oil or penetrating spray (like WD-40) on the screw heads. Let it sit for 10–15 minutes.
Use the right tool. Make sure your screwdriver matches the screw head exactly. A mismatched screwdriver can strip the screw and make it worse.
Apply gentle heat. A warm damp cloth pressed against the base can slightly expand the wood and loosen the fit.
Steady pressure. Turn slowly and deliberately. If a screw resists, stop and reapply oil rather than forcing it.
When to ask for help: If you're worried about damaging the urn, contact the seller or manufacturer. They can sometimes advise on the best approach or, in rare cases, assist with opening.
Ceramic or Porcelain Urns with Stuck Lids
What it is: Ceramic urns sometimes have lids that fit very snugly, especially if they were glazed or sealed before assembly.
How to open it:
Steady grip on the body. Hold the urn firmly (but not gripped so hard your knuckles turn white) with one hand on the body below the lid.
Gentle twisting. Use your other hand to gently twist the lid counterclockwise. Don't jerk or force.
Tap gently. If the lid won't budge, place a soft cloth over the lid and gently tap around the seam with a rubber mallet or the handle of a wooden spoon. This can break surface tension without damaging the urn.
Wiggle and twist together. Combine a gentle side-to-side wiggling motion with slow twisting.
Respectful Handling: Tone and Intention
This is your pet. These are your beloved's remains. There's no "correct" way to feel during this process—some families approach it with quiet sadness, others with gentle ceremony, and some with mixed emotions.
Give yourself permission to take your time. There's no clock. If you need to pause, step away, and come back later, that's completely okay.
Involve family if desired. Some families find comfort in doing this together. Others prefer to do it alone. Both are valid.
Create a quiet moment. Light a candle, play soft music, say a few words, or simply sit with your feelings. This transfer can feel like a final act of care—and it is.
Don't worry about perfection. If some ash settles on the cloth, or a little dust escapes, you haven't done anything wrong. These things happen, and they're not a reflection of your love or respect.
Tools and Materials Summary
Essential:
Permanent pet urn (already chosen)
Funnel (optional but recommended)
Clean cloth or towel
Helpful:
Gloves (latex, nitrile, or cotton)
Paper towels
Screwdriver (flathead or Phillips, depending on urn type)
Small spoon or scoop
Soft cloth for final cleaning
For stuck seals:
Nail polish remover (acetone)
Penetrating oil (WD-40)
Soft plastic scraper
Rubber mallet (optional)
Warm damp cloth
Next Steps After Transfer
Once you've safely transferred your pet's ashes, you might consider:
Memorialization: Explore what to do with pet ashes beyond keeping them in an urn—scattering, planting, or other options.
Additional keepsakes: Browse pet keepsake urns to share your pet's memory with family members.
Urn selection: If you're still deciding, our guide to choosing a pet urn can help you select the right memorial vessel.
For a comprehensive look at the broader pet memorials journey, explore our pet memorial guide for additional planning resources.
Frequently Asked Questions
Is it safe to handle cremated pet ashes?
Yes, absolutely. Cremated ashes are sterile and safe to handle with bare hands. They won't transmit disease or cause harm. You may wear gloves for comfort or peace of mind, but they're not necessary for safety. Some families find that handling their pet's ashes bare-handed feels more intimate and meaningful.
What if I accidentally spill some ashes?
Don't worry—it happens, and it's not a failure or disrespect. If you spill ashes on your work cloth, carefully gather what you can and pour it gently into the urn. Any remaining dust can be carefully swept or wiped into the urn. This is a completely normal part of the process, and your pet wouldn't judge you for it.
How much space do pet ashes take up?
Cremated remains take up far less space than you might expect. A 50-pound dog typically produces 3–4 cups of ashes. Most standard pet urns accommodate this comfortably. If you have a very large pet and want to keep all ashes, confirm your urn's capacity before purchasing. For large pets, you may need a larger urn or plan to split ashes into keepsakes.
Can I transfer ashes multiple times?
Yes. You can transfer ashes as many times as you need—from temporary container to permanent urn, from one urn to another, or into keepsakes. Each transfer follows the same careful process. There's no limit to how many times you can handle or move your pet's ashes.
What if I'm not ready to open the urn yet?
There's no rush. You can keep ashes in the temporary container for as long as you need. Some families wait weeks or months before opening the permanent urn. This is a deeply personal timeline, and there's no "right" moment. Open the urn when you feel ready—not before.
Can I ship an urn with ashes inside?
Yes, but check TSA and shipping regulations. Cremated remains can be shipped via ground transportation. If traveling by air, the rules are strict: ashes must be in the original crematory container (not transferred to a decorative urn), and you'll need a cremation certificate. For specific guidance, check with your airline or crematory before planning to travel with your pet's ashes.
How do I choose between keeping all ashes in one urn or splitting into keepsakes?
This is a personal decision with no right answer. Some families prefer to keep everything together as a unified memorial. Others find meaning in dividing ashes so multiple family members can keep a keepsake. Consider your family's wishes, the number of people who want to memorialize your pet, and your own preferences. If you're uncertain, see our article on whether it's wrong to separate cremated ashes reflect your pet's personality and your family's style. Memorials.com offers a wide range of pet urns to honor your beloved companion, including:
Wooden pet urns for a natural, warm aesthetic
Metal pet urns for durability and elegant design
Ceramic pet urns for artistic and decorative options
Pet keepsake urns for sharing memories with family
Each urn type opens differently, so understanding your urn's mechanism helps you approach the transfer with confidence.
Final Thoughts
Opening your pet's urn and transferring their ashes is an act of care and love. Whether you're doing this with sadness, peace, ceremony, or quiet reflection, you're honoring the bond you shared with your companion.
Take your time. Breathe. Know that this moment, however it unfolds, is a meaningful part of saying goodbye—and remembering the joy your pet brought into your life.
Your beloved pet's memory deserves that care. And so do you.