🏬Supersize Online Funeral Retailer🪦1000's of Headstones⚱️Over 10,000 Cremation Urns⚰️Caskets Overnight Delivery🛒Funeral & Memorial Superstore🚚FREE Shipping on ALL Orders👨👩👧👦Helping Families for over 20 Years💰Lowest Price Guarantee🏬Supersize Online Funeral Retailer🪦1000's of Headstones⚱️Over 10,000 Cremation Urns⚰️Caskets Overnight Delivery🛒Funeral & Memorial Superstore🚚FREE Shipping on ALL Orders👨👩👧👦Helping Families for over 20 Years💰Lowest Price Guarantee
🏬Supersize Online Funeral Retailer🪦1000's of Headstones⚱️Over 10,000 Cremation Urns⚰️Caskets Overnight Delivery🛒Funeral & Memorial Superstore🚚FREE Shipping on ALL Orders👨👩👧👦Helping Families for over 20 Years💰Lowest Price Guarantee🏬Supersize Online Funeral Retailer🪦1000's of Headstones⚱️Over 10,000 Cremation Urns⚰️Caskets Overnight Delivery🛒Funeral & Memorial Superstore🚚FREE Shipping on ALL Orders👨👩👧👦Helping Families for over 20 Years💰Lowest Price Guarantee
How to Fill Cremation Jewelry: Step-by-Step Guide | Memorials.com Info Center
🏬Supersize Online Funeral Retailer🪦1000's of Headstones⚱️Over 10,000 Cremation Urns⚰️Caskets Overnight Delivery🛒Funeral & Memorial Superstore🚚FREE Shipping on ALL Orders👨👩👧👦Helping Families for over 20 Years💰Lowest Price Guarantee🏬Supersize Online Funeral Retailer🪦1000's of Headstones⚱️Over 10,000 Cremation Urns⚰️Caskets Overnight Delivery🛒Funeral & Memorial Superstore🚚FREE Shipping on ALL Orders👨👩👧👦Helping Families for over 20 Years💰Lowest Price Guarantee
Filling your cremation jewelry for the first time can feel daunting. You are handling something irreplaceable, working with tiny components you may never have seen before, and doing it all while navigating a very tender moment. The process itself, though, is simpler than it looks – and thousands of families complete it at home every day.
This guide walks you through every step clearly: how to identify your closure type, how to prepare your workspace, how to fill the jewelry without spillage, and how to seal it so the ashes stay secure for a lifetime of wear. If you are still exploring what is cremation jewelry and how different styles work, our introductory guide covers every type and closure design before you reach the filling step.
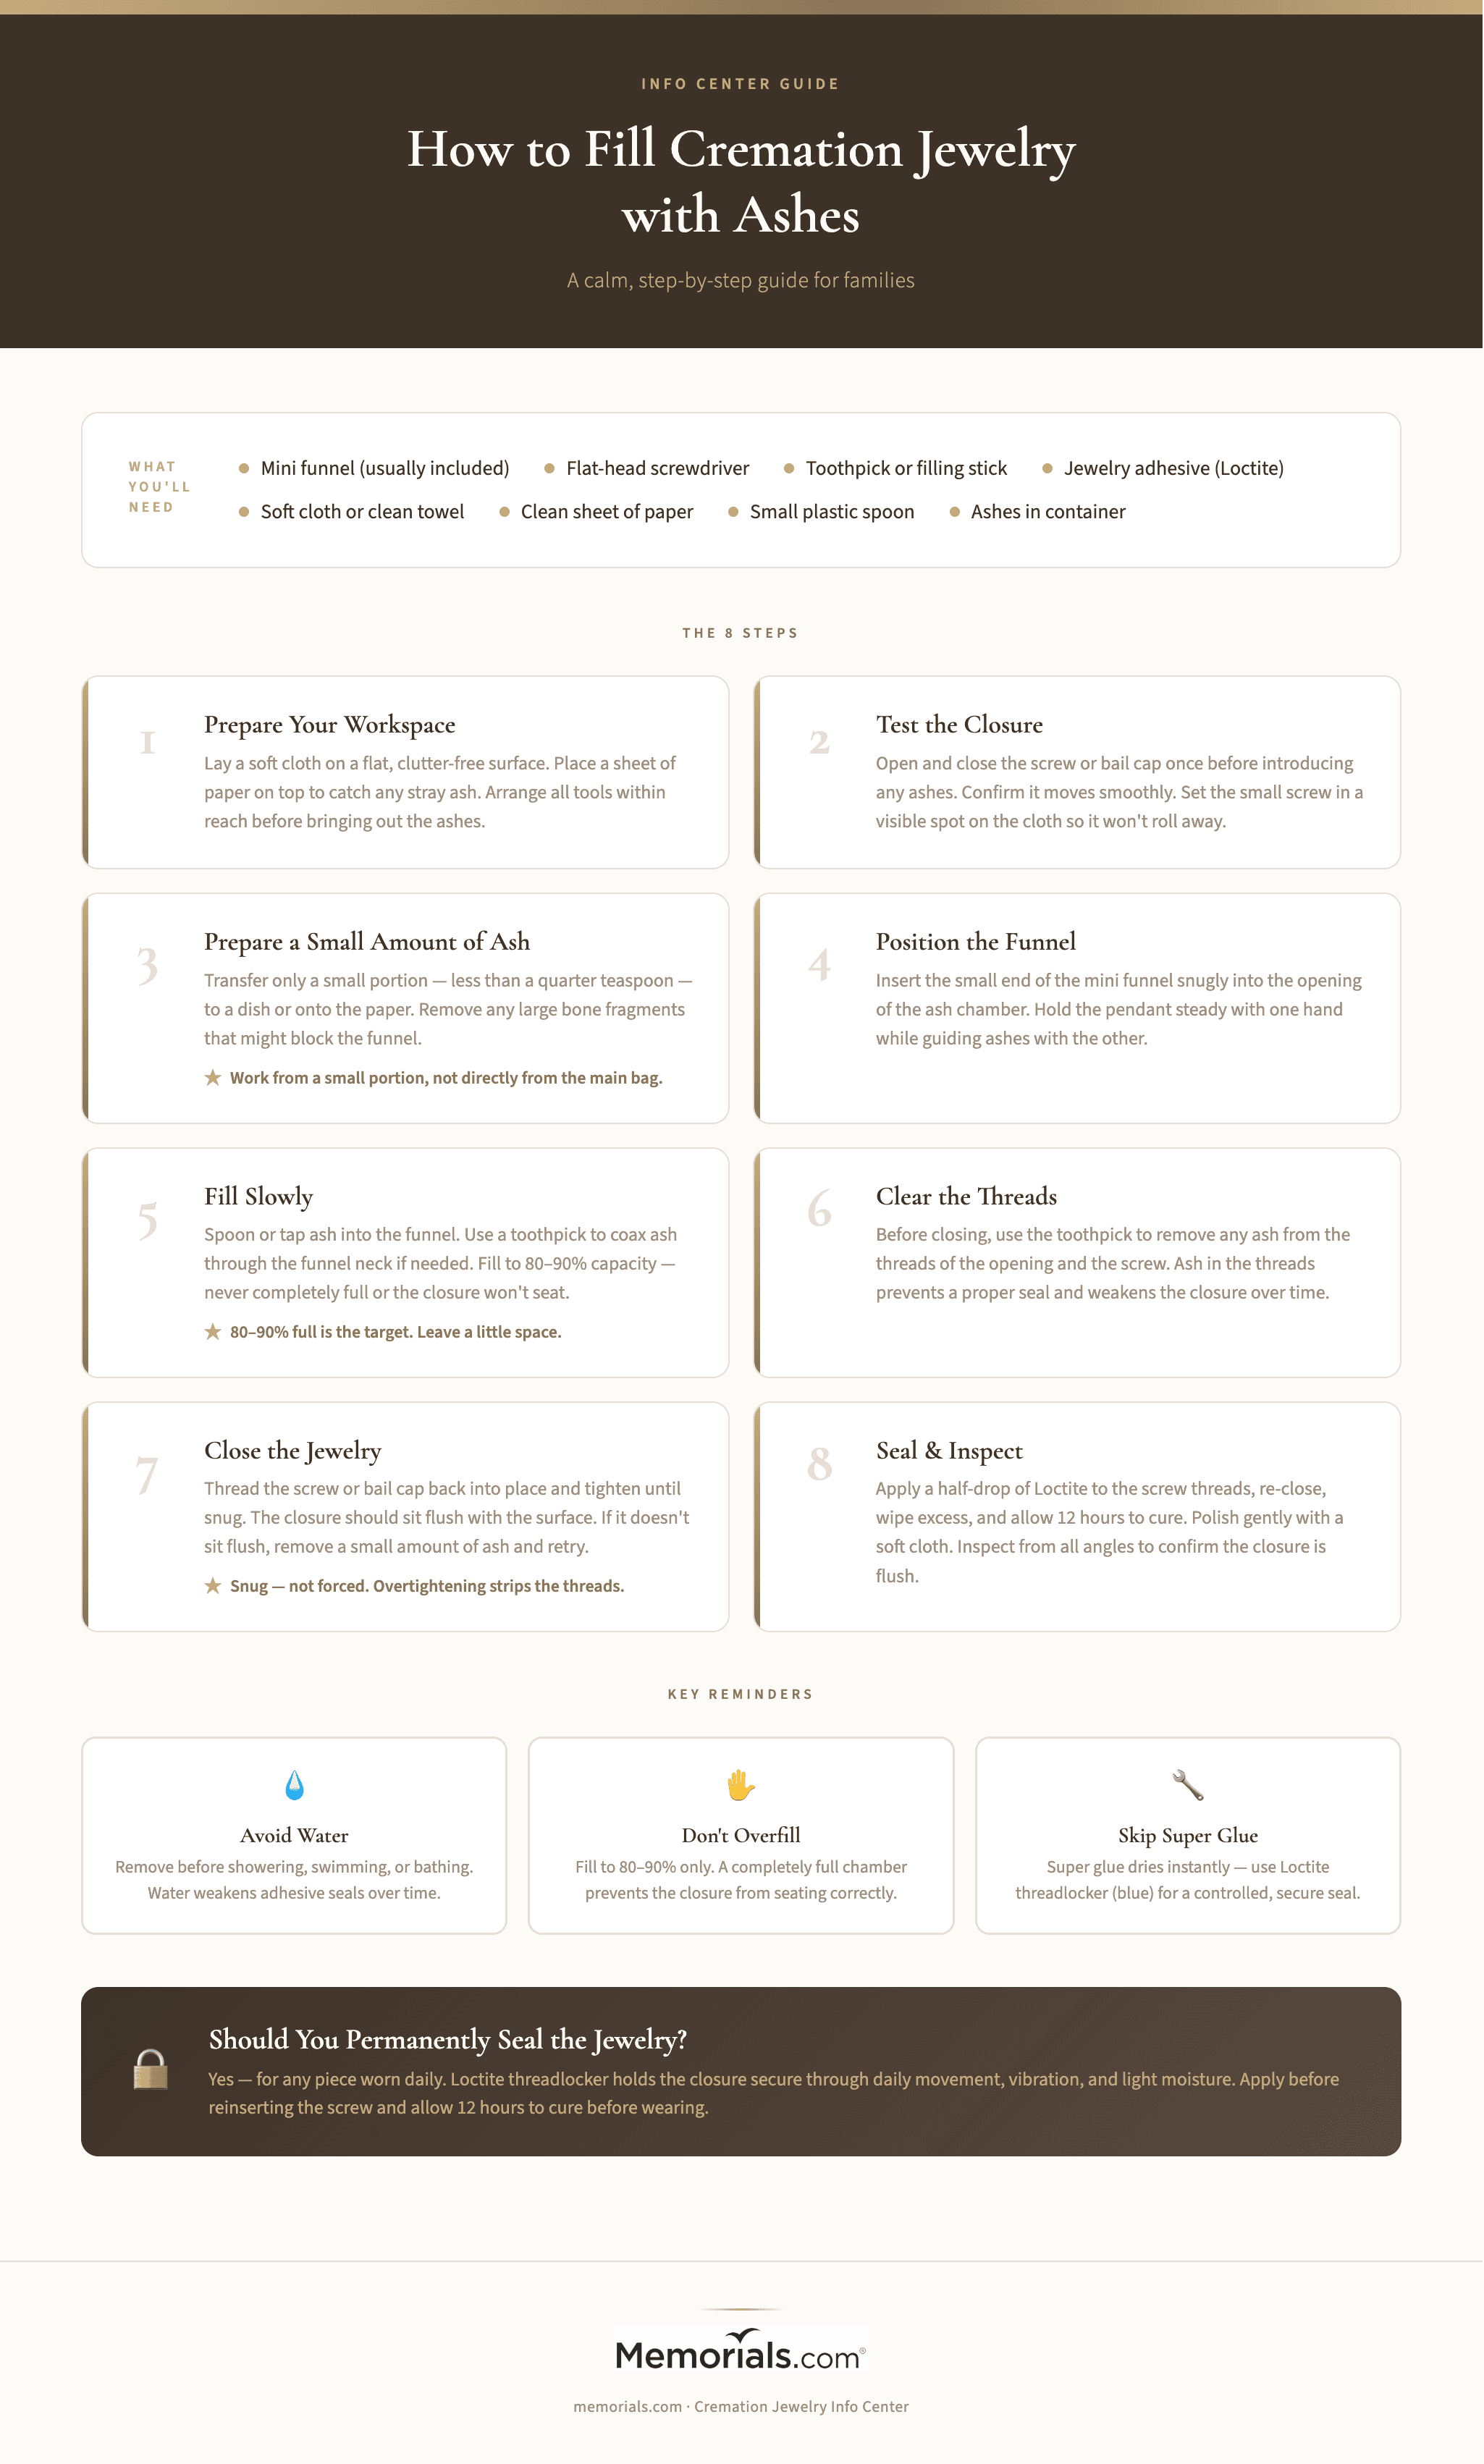
Most cremation jewelry sold by reputable retailers ships with a small kit that includes most of what you need. Before you begin, gather the following:
Usually included with your jewelry:
Mini funnel (typically metal or plastic)
Small flat-head screwdriver
Toothpick or filling stick
Jewelry adhesive or Loctite threadlocker (for sealing)
Items you'll supply:
Soft cloth or clean hand towel (to protect the jewelry and catch spills)
A flat, uncluttered surface – a kitchen table works well
A clean sheet of paper (to corral stray ash)
A small plastic spoon or craft stick (to transfer ashes)
The urn or container holding your loved one's cremated remains
If your jewelry did not arrive with a kit, a mini funnel can be sourced inexpensively from any kitchen supply store. A substitute paper funnel is also easy to make from a small square of paper folded into a cone shape. The type of metal or material your piece is made from can affect how carefully you need to handle it during filling — our cremation jewelry materials guide explains the differences between sterling silver, stainless steel, and other common options.
Understanding Your Jewelry's Closure Type
Before opening anything, spend a few moments identifying how your piece opens and closes. The filling process differs slightly depending on the closure style.
Threaded screw closure The most common design. A small screw – usually located on the back, bottom, or side of the pendant – is removed with a flat-head screwdriver to reveal the ash chamber. Most cremation pendants and urn necklaces use this system.
Bail cap closure The bail is the loop at the top of the pendant through which the chain passes. On some designs, the bail itself unscrews by hand to open the inner compartment. No screwdriver is required. Once filled, the bail is re-threaded by hand, and adhesive is applied to seal it.
Locket or hinged closure Less common in modern ash-holding jewelry. The pendant opens on a small hinge. Fill by spooning a small amount of ash directly into the chamber, then close and latch.
Glass or resin jewelryGlass cremation jewelry – such as hand-blown pendants – is made differently. Ashes are fused into the glass during the manufacturing process, not added afterward. If you own a glass piece, it cannot be filled at home. Contact the maker directly.
Take a moment to open and close your jewelry once before any ashes are involved. This confirms the mechanism is working smoothly and gives you confidence before the actual fill.
Preparing Your Workspace
A well-organized workspace prevents spills and reduces stress. Before you bring out the ashes, set everything up:
Clear a flat surface – wipe away any crumbs, dust, or debris so nothing contaminates the cremated remains.
Lay the soft cloth across the surface. The cloth protects the jewelry from scratches, catches small parts if they roll, and makes cleanup of stray ash much easier.
Place a clean sheet of paper on top of the cloth, directly under where you'll be working. Any ash that misses the funnel lands on the paper – and can be carefully folded and returned to the main container.
Arrange all your tools within easy reach: funnel, screwdriver, toothpick, adhesive, and spoon.
Set the ashes nearby but with the lid secured until you are ready.
Cremated remains are typically received in a sealed polyethylene bag inside a box. You don't need the entire bag open – just enough access to transfer a small amount to a dish or spoon.
If you would find it comforting, take a moment before beginning: light a candle, play music your loved one enjoyed, or simply take a few slow breaths. Many families treat this transfer as a private ritual, and there is no right or wrong way to approach it emotionally.
How to Fill Cremation Jewelry: 8 Steps
Step 1: Test the closure
Open and close the jewelry once or twice before introducing any ashes. Confirm the screw turns smoothly and that you can close it confidently. If the screw is stiff, do not force it – use the smallest flathead screwdriver you have, as too large a blade can damage the threads. For bail closures, twist counterclockwise to open.
Once you have confirmed the mechanism, set the screw or cap aside in a visible spot where it will not roll off the cloth.
Step 2: Prepare a small amount of ash
Cremated remains are not uniform powder – they range from fine dust to small granular pieces, similar to coarse sand. The ash chamber in most jewelry holds only a small pinch – often less than a quarter teaspoon. You do not need to fill it to capacity.
Use a small spoon or craft stick to transfer a conservative amount of ash to a clean dish or onto the paper sheet. Working from this smaller portion, rather than directly from the main bag, gives you better control and prevents overfilling.
If your ashes contain any larger pieces of bone fragment, set those aside using the spoon. Larger pieces can block the funnel or prevent the closure from seating correctly.
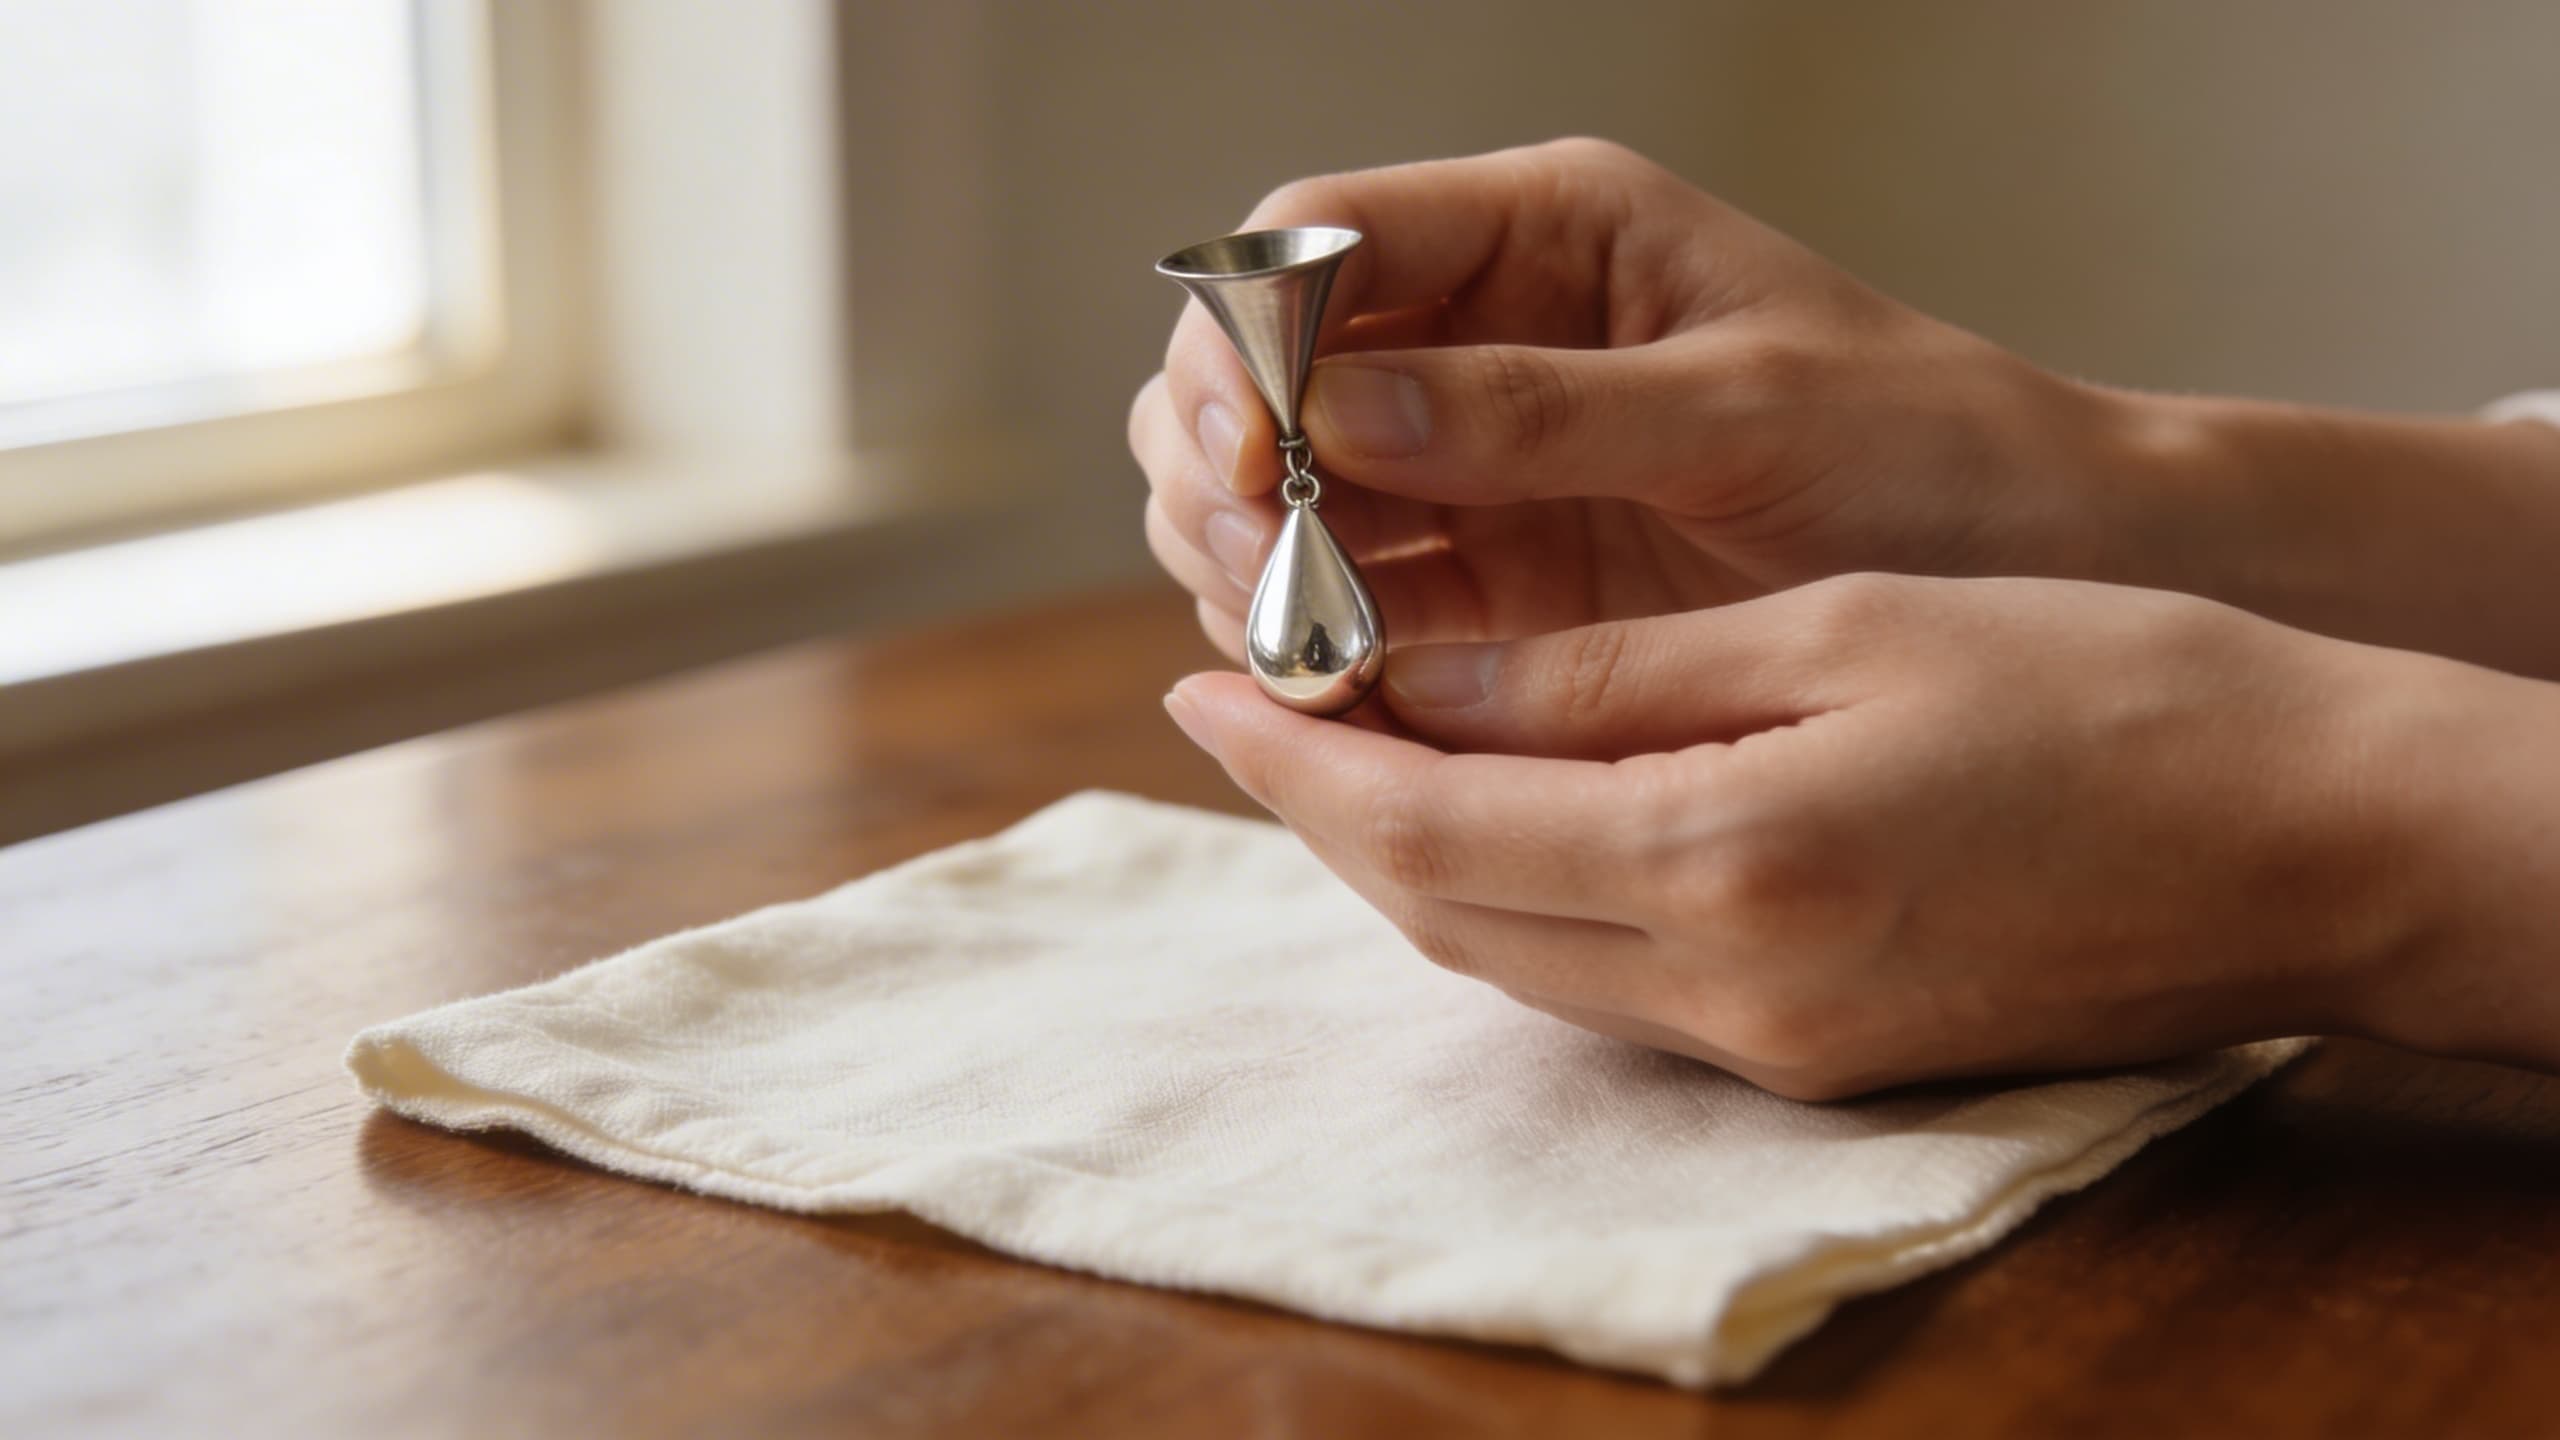
Step 3: Position the funnel
Insert the small end of the mini funnel into the opening of the ash chamber. The funnel should sit snugly in the opening – not loosely balanced. If the funnel's opening is slightly too wide for the hole, a rolled paper funnel with a smaller tip often works better.
Hold the pendant steady with one hand while guiding ashes with the other. Work slowly – there is no need to rush.
Step 4: Transfer the ashes
Using the spoon or toothpick, guide a small amount of ash into the funnel opening. Tap the side of the funnel gently with your finger to encourage ash to fall through. If ash is slow to move, use a toothpick or filling stick to gently coax it through the funnel neck – do not poke aggressively, as this can compact the ash and create a blockage.
Fill the chamber to approximately 80-90% capacity. This is important: if the chamber is completely full, the screw or bail will not seat flush, and the closure will be compromised. Leaving a small amount of space ensures the jewelry closes and seals correctly.
Step 5: Clear the threads
Before closing, use the toothpick to gently clean any ash from the threads of the opening and from the threads of the screw or bail cap. Even a small amount of ash caught in the threads can prevent the closure from seating properly and weaken the seal over time.
This step is easy to skip under the emotion of the moment – but it is one of the most important. Take your time here.
Step 6: Close the jewelry
Thread the screw or bail cap back into place and tighten slowly. The closure should feel snug and sit flush with the surface of the pendant. If it does not sit flush, the chamber is likely overfilled – remove the screw, tap a small amount of ash back onto the paper, and retry.
Do not overtighten. You want the threads secure, not stressed. Excessive force can strip the threads, particularly on fine sterling silver pieces.
Step 7: Seal with adhesive (recommended)
Most manufacturers strongly recommend permanently sealing your jewelry after filling. The seal prevents the screw from loosening during daily wear and protects the ashes from moisture or vibration.
The preferred product is Loctite threadlocker (the blue formula). It holds securely but does not dry instantly, giving you a moment to adjust if the bail is a pendant that needs to hang at a specific angle before it cures. Avoid super glue – it dries too quickly and is nearly impossible to reposition if the bail is misaligned.
To apply: place a very small drop – half a drop is often enough – onto the threads of the screw before reinserting. Thread the closure back in, wipe away any excess immediately with a damp cloth, and do not wear the piece for at least 12 hours while the adhesive cures.
Step 8: Clean and inspect
Wipe the exterior of the pendant gently with a soft polishing cloth to remove any fingerprints or stray ash from the surface. Hold the piece up and inspect the closure from all angles – it should sit flush with no gap. Give the screw a gentle test with your fingertip (not a tool) to confirm it is secure.
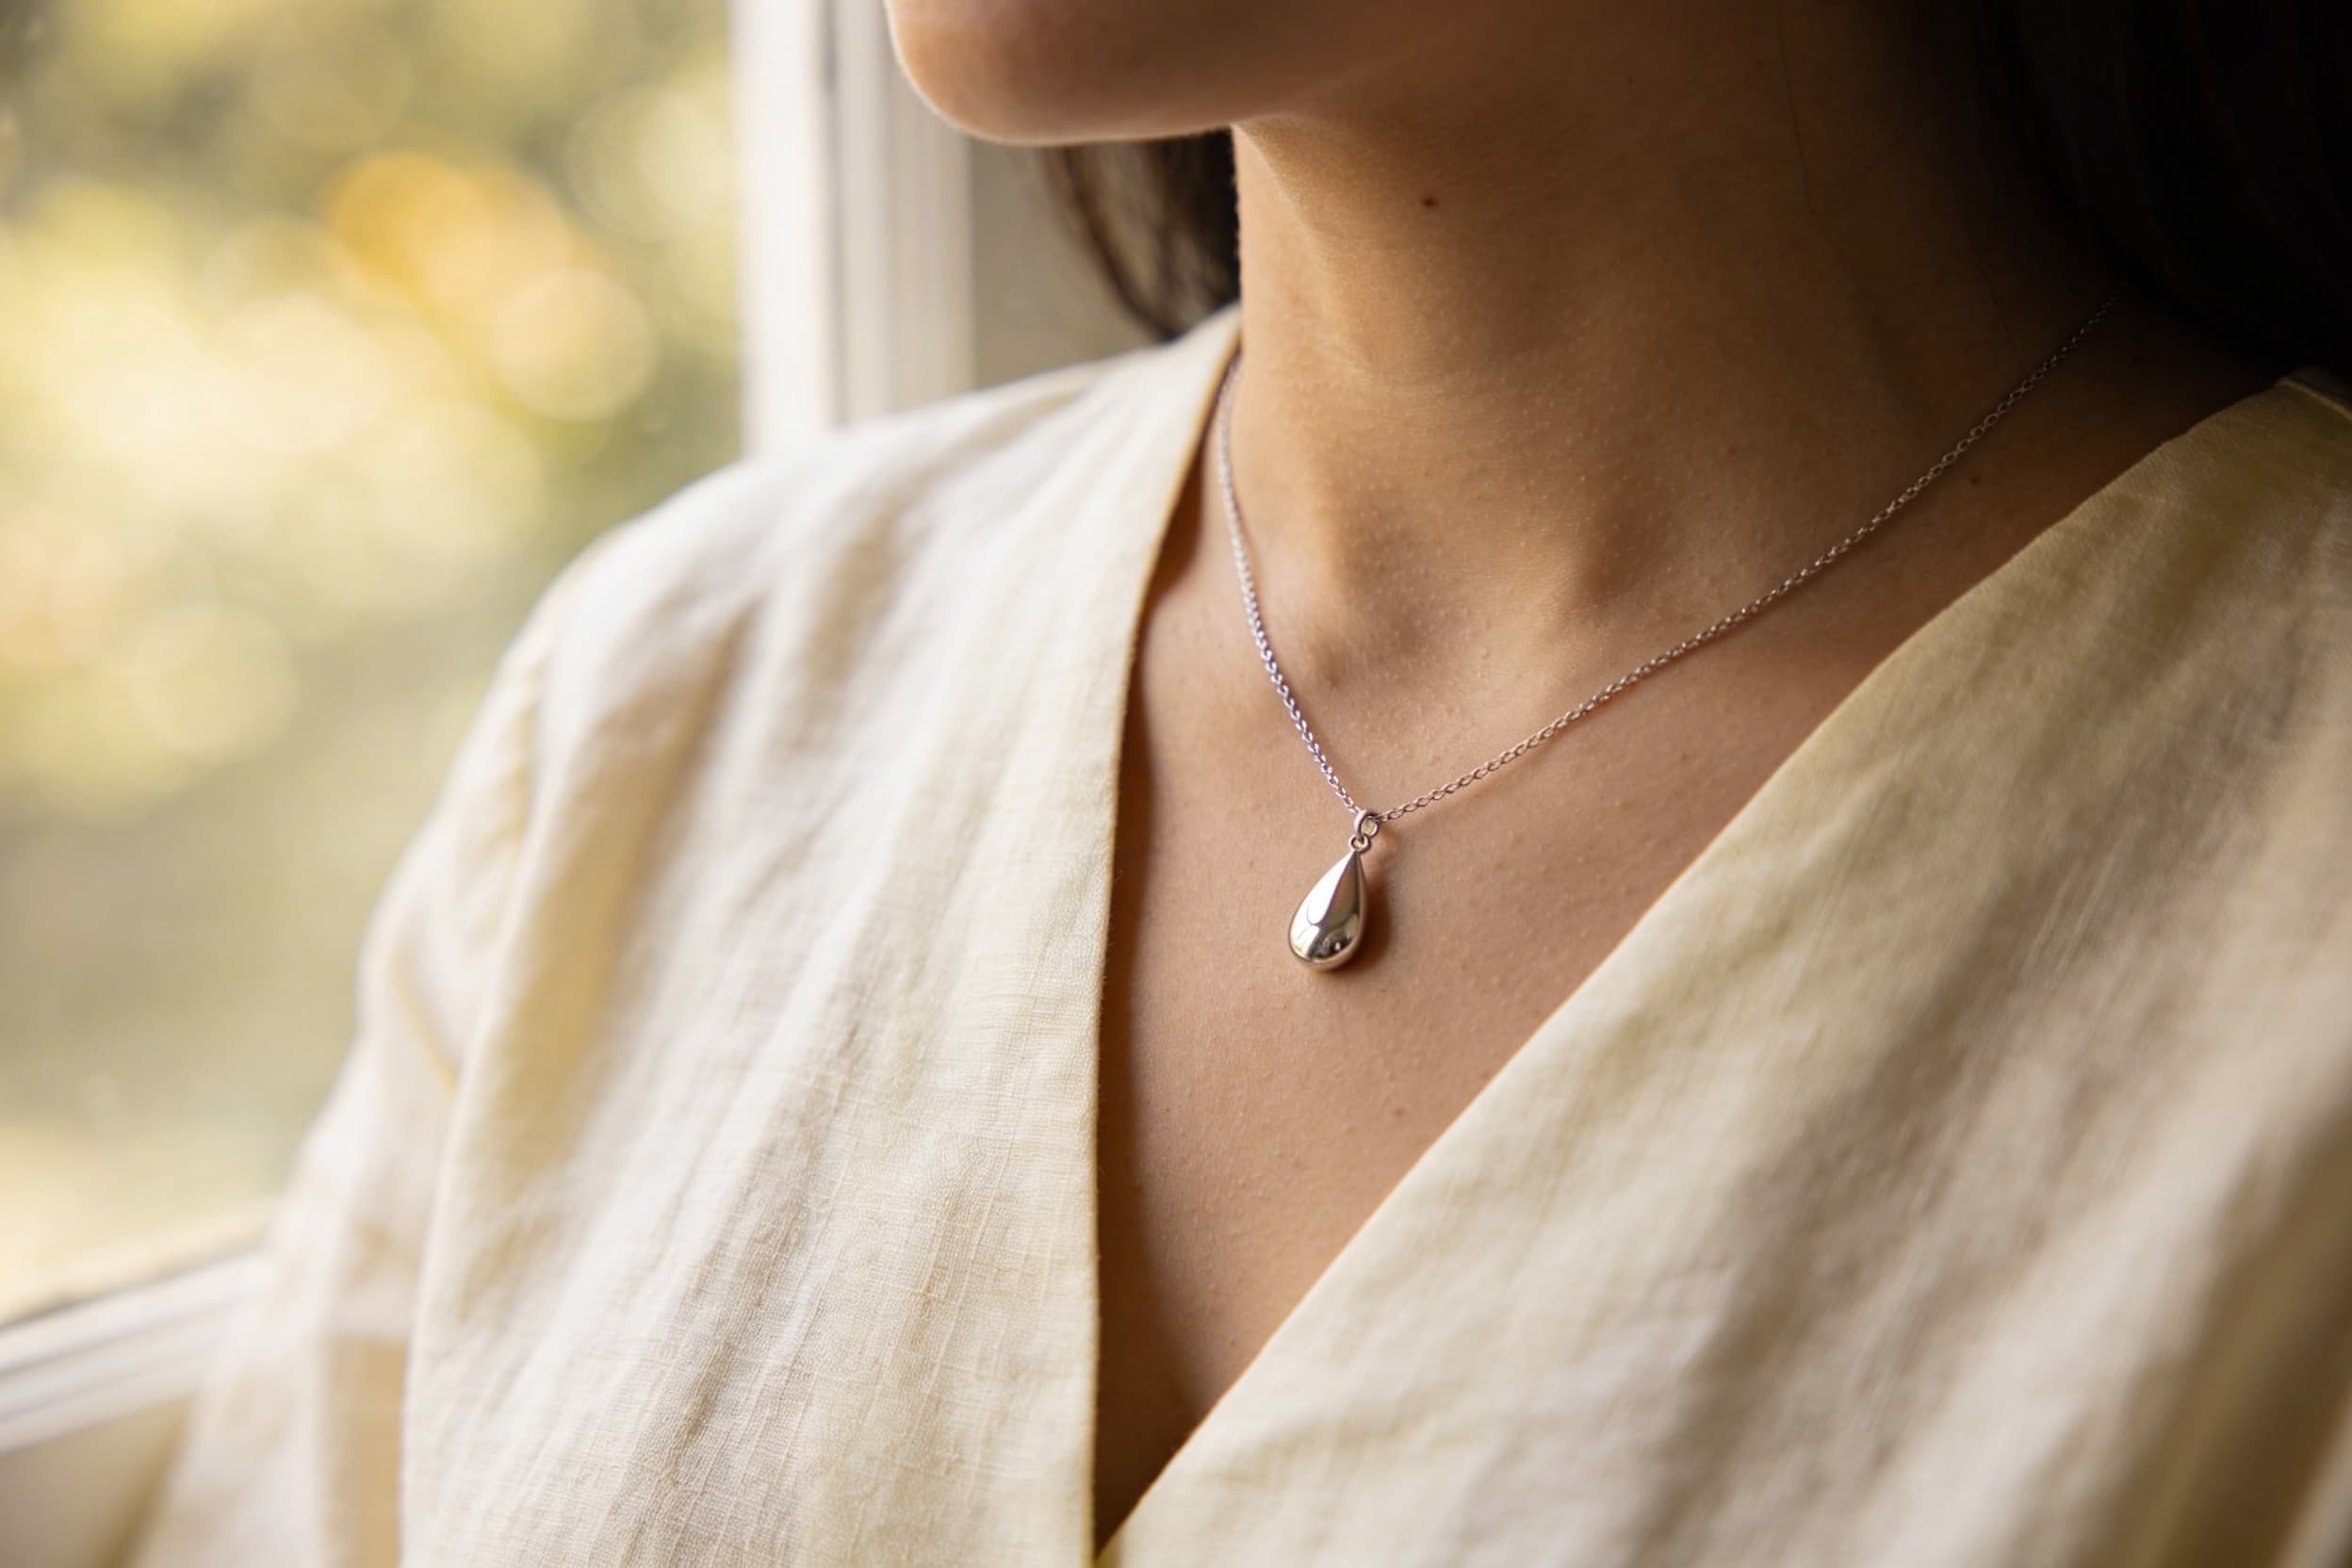
Your jewelry is now filled, sealed, and ready to wear.
How Much Ash Should You Use?
Only a small amount is needed – typically a pinch, or what some retailers describe as a "symbolic portion." The average ash chamber holds far less than a teaspoon. This is one of the most common concerns families have before filling, and it is worth emphasizing: you are not committing all of your loved one's remains to a single piece.
The main urn remains primary. The jewelry holds a token amount – a way of keeping your loved one close in your daily life while the larger memorial stays intact at home or in another meaningful place. Many families fill multiple pieces – a pendant for themselves, one for a sibling, one for a grandchild – all from the same urn.
Yes, in almost every case. While the screw closure provides a secure fit on its own, daily wear creates vibration, movement, and exposure to moisture that can gradually loosen even a well-seated screw. A permanent seal with jewelry adhesive adds an important layer of security.
The main exception: if you are uncertain whether you want the ashes to stay in the piece permanently – for instance, if you are considering transferring them later or are filling on a trial basis – you may choose to skip sealing for now. Be aware that an unsealed piece carries a small but real risk of the closure loosening during regular wear.
If you are filling a piece that you intend to wear daily, seal it.
What If I Spill?
Spills happen, and they are more common than people expect – particularly during a first fill when hands may be unsteady. If ashes fall onto the cloth or paper beneath the jewelry, do not panic.
Use the folded paper to carefully funnel any spilled ash back toward the original container. Cremated remains are not toxic and safe to handle. If the spill is on a hard surface, a clean dry brush or folded paper can gather the ash respectfully.
Take your time. There is no deadline. If you need to stop and return to the process later, cover everything and step away.
Can Someone Else Fill It for You?
Absolutely. If the process feels too difficult emotionally or physically, many funeral homes will fill cremation jewelry for you at no charge or for a small fee. Local jewelers with experience in memorial pieces may also assist.
There is no obligation to fill the jewelry yourself. Some families find it meaningful to do it personally; others prefer to have it handled by a professional. Both choices are valid.
If you ask a funeral director or jeweler to fill the piece, bring the jewelry, the filling kit, and a small separate container holding only the amount of ash needed – this is safer than bringing the entire main urn.
What Else Can You Put in Cremation Jewelry?
Cremation jewelry is designed for ashes but is not limited to them. Families sometimes fill pieces with:
A lock of hair
Dried flowers from the memorial service
A small amount of soil from a meaningful location
Sand from a beloved beach
Whatever you choose, the material should be dry, fine enough to pass through the funnel, and small enough to allow the closure to seat properly. Avoid anything moist, which can damage the interior of the piece over time.
After Filling: Caring for Your Jewelry
Once your jewelry is filled and sealed, a few habits will keep both the piece and its contents protected:
Remove before water exposure. Do not shower, swim, or bathe while wearing cremation jewelry. Water can weaken adhesive seals over time, even on pieces described as water-resistant. This applies to urn necklaces, bracelets, and rings alike.
Avoid harsh chemicals. Perfume, hand lotion, and cleaning products can degrade the finish and the seal. Put your jewelry on last when getting dressed, and remove it first before using lotions or cleaning products.
Store properly. When not wearing the piece, store it in a jewelry box or soft pouch away from direct sunlight and humidity. If your jewelry came with a display case, that is an ideal storage option. Jewelry display cases designed for memorial pieces provide both protection and a dignified place to keep the jewelry between wearings.
Inspect the seal periodically. Every month or two, check the closure to confirm it remains snug. If you notice any loosening, clean the threads and reapply a small amount of adhesive.
Clean gently. Use a soft jewelry polishing cloth – not liquid cleaners or ultrasonic cleaners. For sterling silver, a silver polishing cloth lifts tarnish without risking the seal. For stainless steel, a damp cloth with mild soap is sufficient.
If your piece uses a separate jewelry chain, inspect the chain clasp and links regularly. Chains are more susceptible to daily wear than the pendant itself and may need replacement over time. For a complete long-term maintenance routine, our guide to how to care for cremation jewelry covers cleaning by material type, storage best practices, and when to seek professional repair.
Frequently Asked Questions
How much ash do I put in cremation jewelry? A pinch – typically less than a quarter teaspoon. The ash chamber in most jewelry is very small. Fill to approximately 80-90% capacity to ensure the closure seats and seals properly. The rest of the cremated remains can stay in the main urn.
Do I have to permanently seal cremation jewelry? It is strongly recommended. Daily wear creates movement and vibration that can gradually loosen even a well-fitted screw. Sealing with Loctite threadlocker protects the ashes and gives peace of mind. If you choose not to seal permanently, inspect the closure frequently.
What glue do you use to seal cremation jewelry? The most commonly recommended product is Loctite threadlocker (blue formula). It holds securely under daily wear, is safe for metal surfaces, and does not dry instantly – giving you time to position the bail correctly if alignment matters. Avoid super glue, which dries too fast to allow adjustment.
Can I fill cremation jewelry myself? Yes. The process takes only a few minutes once you have gathered the tools and identified your closure type. Most families complete it at home without difficulty. If you would prefer professional help, a funeral home or jeweler with experience in memorial pieces can fill the jewelry for you.
What if the screw won't close after filling? The chamber is likely overfilled. Remove the screw, tap a small amount of ash back onto the paper, and retry. The closure should sit flush with the surface when the correct amount of ash is present. Trying to force a closure over too much ash can strip the threads.
Finding the Right Cremation Jewelry
If you are still selecting a piece, our full collection of memorial jewelry includes hundreds of styles – from minimalist stainless steel pendants to engraved keepsakes in gold and sterling silver. Our complete guide to cremation jewelry covers types, materials, pricing, and how to choose a piece that suits your style and budget.
For families honoring a pet, our pet cremation jewelry collection includes dedicated styles designed to hold a small portion of an animal companion's ashes.